> ## Documentation Index
> Fetch the complete documentation index at: https://docs-staging-chore-myaccount-api-autoupdate.mintlify.site/llms.txt
> Use this file to discover all available pages before exploring further.

> Forms for Actions を使用して、追加のサインアップ手順を設定する方法を学びます

# ユースケース: Forms を使用した追加のサインアップ手順の設定

<Card title="始める前に">
  1. 次のスコープを有効にして、[Machine-to-Machine Application](/docs/ja-jp/get-started/auth0-overview/create-applications/machine-to-machine-apps) を作成します。

  * `read:users`
  * `update:users`
  * `create:users`
  * `read:users_app_metadata`
  * `update:users_app_metadata`
  * `create:users_app_metadata`

  2. M2M アプリケーションの認証情報を使用して、[Vault 接続](/docs/ja-jp/customize/forms/vault) を追加します。
</Card>

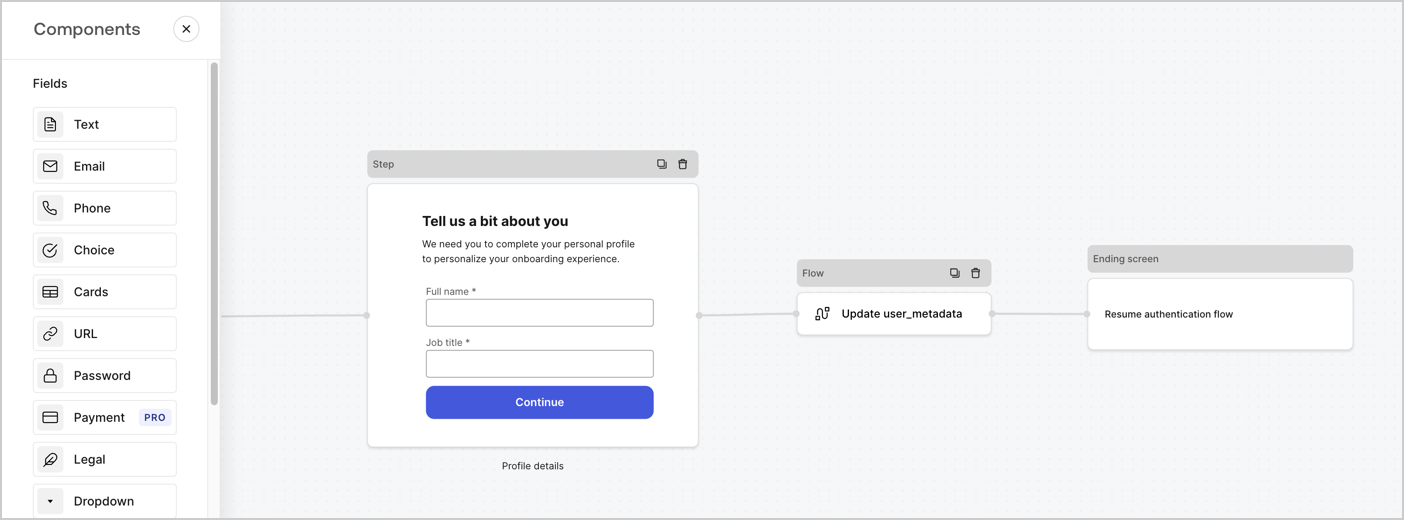
Forms for Actions を使用すると、サインアップフローやログインフローに追加のステップを作成し、ユーザーがアプリケーションにアクセスする前にそれらを必須にできます。
<Frame>
  <img src="https://mintcdn.com/docs-staging-chore-myaccount-api-autoupdate/chzCkjAmoOTh74XU/docs/images/cdy7uua7fh8z/ZOQNi6SrEC9OREcBbdiJ3/d79f84fb61acd5473bdf932527e26d58/custom-signup-form.png?fit=max&auto=format&n=chzCkjAmoOTh74XU&q=85&s=3df927db158a9b6fd996f8cc5f6d6314" alt="Dashboard > Actions > Forms > ユースケース: カスタムサインアップフォーム" data-og-width="1404" width="1404" data-og-height="520" height="520" data-path="docs/images/cdy7uua7fh8z/ZOQNi6SrEC9OREcBbdiJ3/d79f84fb61acd5473bdf932527e26d58/custom-signup-form.png" data-optimize="true" data-opv="3" srcset="https://mintcdn.com/docs-staging-chore-myaccount-api-autoupdate/chzCkjAmoOTh74XU/docs/images/cdy7uua7fh8z/ZOQNi6SrEC9OREcBbdiJ3/d79f84fb61acd5473bdf932527e26d58/custom-signup-form.png?w=280&fit=max&auto=format&n=chzCkjAmoOTh74XU&q=85&s=37b8e7c78fe34c6a81a496f20a79f27e 280w, https://mintcdn.com/docs-staging-chore-myaccount-api-autoupdate/chzCkjAmoOTh74XU/docs/images/cdy7uua7fh8z/ZOQNi6SrEC9OREcBbdiJ3/d79f84fb61acd5473bdf932527e26d58/custom-signup-form.png?w=560&fit=max&auto=format&n=chzCkjAmoOTh74XU&q=85&s=ad06bf075887efea6830108011d193e5 560w, https://mintcdn.com/docs-staging-chore-myaccount-api-autoupdate/chzCkjAmoOTh74XU/docs/images/cdy7uua7fh8z/ZOQNi6SrEC9OREcBbdiJ3/d79f84fb61acd5473bdf932527e26d58/custom-signup-form.png?w=840&fit=max&auto=format&n=chzCkjAmoOTh74XU&q=85&s=3e3838f787bc05889d023886cbf9a395 840w, https://mintcdn.com/docs-staging-chore-myaccount-api-autoupdate/chzCkjAmoOTh74XU/docs/images/cdy7uua7fh8z/ZOQNi6SrEC9OREcBbdiJ3/d79f84fb61acd5473bdf932527e26d58/custom-signup-form.png?w=1100&fit=max&auto=format&n=chzCkjAmoOTh74XU&q=85&s=8897300452e20cf2f921bd369e836bbd 1100w, https://mintcdn.com/docs-staging-chore-myaccount-api-autoupdate/chzCkjAmoOTh74XU/docs/images/cdy7uua7fh8z/ZOQNi6SrEC9OREcBbdiJ3/d79f84fb61acd5473bdf932527e26d58/custom-signup-form.png?w=1650&fit=max&auto=format&n=chzCkjAmoOTh74XU&q=85&s=aa258df2a2a73fc62c0028a47cadb382 1650w, https://mintcdn.com/docs-staging-chore-myaccount-api-autoupdate/chzCkjAmoOTh74XU/docs/images/cdy7uua7fh8z/ZOQNi6SrEC9OREcBbdiJ3/d79f84fb61acd5473bdf932527e26d58/custom-signup-form.png?w=2500&fit=max&auto=format&n=chzCkjAmoOTh74XU&q=85&s=1da57daa9afd59741ea41200bcf8bbb8 2500w" />
</Frame>

以下のセクションでは、ノードとフローを使用して追加のサインアップステップ用フォームを作成する方法と、そのフォームを [Post Login](/docs/ja-jp/customize/actions/explore-triggers/signup-and-login-triggers/login-trigger) Action に追加する手順について説明します。

<h2 id="create-a-form-from-scratch">
  ゼロからフォームを作成する
</h2>

情報を収集するためのフォームを作成するには、次の手順に従います。

1. **Auth0 Dashboard > Actions > Forms** を選択して、フォームエディターを開きます。
2. **Create Form** > **Start from scratch** を選択します。

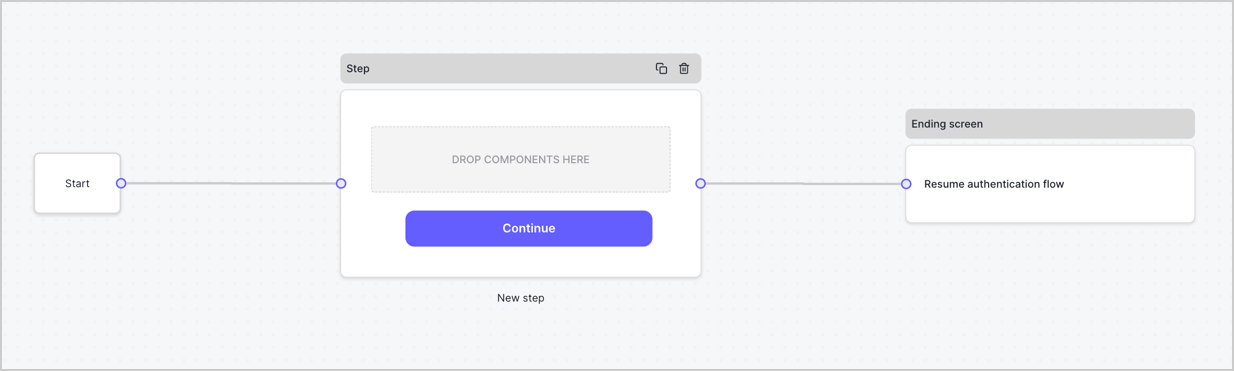
デフォルトでは、新しいフォームには Start ノード、Step ノード、Ending screen ノードが含まれます。
<Frame>
  <img src="https://mintcdn.com/docs-staging-chore-myaccount-api-autoupdate/XSZIwv0-vQPlgEcO/docs/images/cdy7uua7fh8z/2TZ9jSjgEcARFpULI6hz4R/a4319a1bd482f2ee5cc23100fdb2f42c/New-form-Forms-for-action-use-case.png?fit=max&auto=format&n=XSZIwv0-vQPlgEcO&q=85&s=fe4547d8d2a619f45dbfb09783ebe5da" alt="Dashboard > Forms > Use Cases > Form" data-og-width="1234" width="1234" data-og-height="371" height="371" data-path="docs/images/cdy7uua7fh8z/2TZ9jSjgEcARFpULI6hz4R/a4319a1bd482f2ee5cc23100fdb2f42c/New-form-Forms-for-action-use-case.png" data-optimize="true" data-opv="3" srcset="https://mintcdn.com/docs-staging-chore-myaccount-api-autoupdate/XSZIwv0-vQPlgEcO/docs/images/cdy7uua7fh8z/2TZ9jSjgEcARFpULI6hz4R/a4319a1bd482f2ee5cc23100fdb2f42c/New-form-Forms-for-action-use-case.png?w=280&fit=max&auto=format&n=XSZIwv0-vQPlgEcO&q=85&s=78911f814a627fc432f412310e1a31cc 280w, https://mintcdn.com/docs-staging-chore-myaccount-api-autoupdate/XSZIwv0-vQPlgEcO/docs/images/cdy7uua7fh8z/2TZ9jSjgEcARFpULI6hz4R/a4319a1bd482f2ee5cc23100fdb2f42c/New-form-Forms-for-action-use-case.png?w=560&fit=max&auto=format&n=XSZIwv0-vQPlgEcO&q=85&s=742b733d40399d44a140a73d77f16114 560w, https://mintcdn.com/docs-staging-chore-myaccount-api-autoupdate/XSZIwv0-vQPlgEcO/docs/images/cdy7uua7fh8z/2TZ9jSjgEcARFpULI6hz4R/a4319a1bd482f2ee5cc23100fdb2f42c/New-form-Forms-for-action-use-case.png?w=840&fit=max&auto=format&n=XSZIwv0-vQPlgEcO&q=85&s=54adb6d457a7f25c25c8204d74e8e73e 840w, https://mintcdn.com/docs-staging-chore-myaccount-api-autoupdate/XSZIwv0-vQPlgEcO/docs/images/cdy7uua7fh8z/2TZ9jSjgEcARFpULI6hz4R/a4319a1bd482f2ee5cc23100fdb2f42c/New-form-Forms-for-action-use-case.png?w=1100&fit=max&auto=format&n=XSZIwv0-vQPlgEcO&q=85&s=155493b1e7a9f2b9da15fe2b2530f248 1100w, https://mintcdn.com/docs-staging-chore-myaccount-api-autoupdate/XSZIwv0-vQPlgEcO/docs/images/cdy7uua7fh8z/2TZ9jSjgEcARFpULI6hz4R/a4319a1bd482f2ee5cc23100fdb2f42c/New-form-Forms-for-action-use-case.png?w=1650&fit=max&auto=format&n=XSZIwv0-vQPlgEcO&q=85&s=5d27b4c94c47cd0cfd557abbe1ce850c 1650w, https://mintcdn.com/docs-staging-chore-myaccount-api-autoupdate/XSZIwv0-vQPlgEcO/docs/images/cdy7uua7fh8z/2TZ9jSjgEcARFpULI6hz4R/a4319a1bd482f2ee5cc23100fdb2f42c/New-form-Forms-for-action-use-case.png?w=2500&fit=max&auto=format&n=XSZIwv0-vQPlgEcO&q=85&s=4bca5d7daf4c8eec01ecb1913f7373cd 2500w" />
</Frame>

<h3 id="configure-the-step-node">
  Step ノードを設定する
</h3>

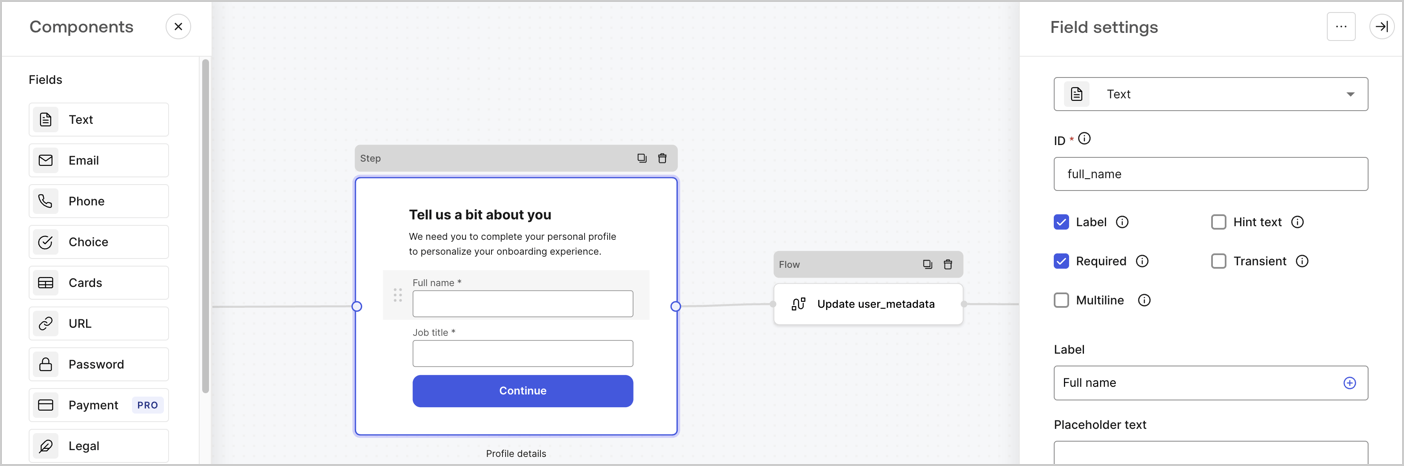
Step ノードは、ユーザーに表示される画面です。次の手順に従って Step ノードに [Fields](/docs/ja-jp/customize/forms/nodes-and-components) を追加し、ユーザーの氏名と役職を収集します。

1. **Components menu** から **Rich text** フィールドを **Step** ノードにドラッグします。

   * **Rich text**: カスタムメッセージを入力します。
   * **Save** を選択します。
2. **Text** フィールドを **Step** ノードにドラッグします。

   * **ID**: `full_name` と入力します。
   * **Label**: `Full name` と入力します。
   * **Label**: チェックボックスをオンにします。
   * **Required**: チェックボックスをオンにします。
   * **Save** を選択します。
3. **Text** フィールドを **Step** ノードにドラッグします。

   * **ID**: `job_title` と入力します。
   * **Label**: `Job title.` と入力します。
   * **Label**: チェックボックスをオンにします。
   * **Required**: チェックボックスをオンにします。
   * **Save** を選択します。
4. 保存するには **Publish** を選択します。
<Frame>
  <img src="https://mintcdn.com/docs-staging-chore-myaccount-api-autoupdate/o1UR_wVpl9p5EHsG/docs/images/cdy7uua7fh8z/6Kcn0ai9fsVsqHwZpTGByG/37cbf4ffee63a7010926b15f06dd20ac/custom-signup-step-node.png?fit=max&auto=format&n=o1UR_wVpl9p5EHsG&q=85&s=7abf79fcb4e8b5608b8dbe829a899198" alt="Dashboard > Actions > Forms > Use Case Custom Signup Steps Step node" data-og-width="1404" width="1404" data-og-height="466" height="466" data-path="docs/images/cdy7uua7fh8z/6Kcn0ai9fsVsqHwZpTGByG/37cbf4ffee63a7010926b15f06dd20ac/custom-signup-step-node.png" data-optimize="true" data-opv="3" srcset="https://mintcdn.com/docs-staging-chore-myaccount-api-autoupdate/o1UR_wVpl9p5EHsG/docs/images/cdy7uua7fh8z/6Kcn0ai9fsVsqHwZpTGByG/37cbf4ffee63a7010926b15f06dd20ac/custom-signup-step-node.png?w=280&fit=max&auto=format&n=o1UR_wVpl9p5EHsG&q=85&s=e892bacec3bead9534e6c2f15f283406 280w, https://mintcdn.com/docs-staging-chore-myaccount-api-autoupdate/o1UR_wVpl9p5EHsG/docs/images/cdy7uua7fh8z/6Kcn0ai9fsVsqHwZpTGByG/37cbf4ffee63a7010926b15f06dd20ac/custom-signup-step-node.png?w=560&fit=max&auto=format&n=o1UR_wVpl9p5EHsG&q=85&s=75ec409a9c5d52823b9fab9dc75f2e36 560w, https://mintcdn.com/docs-staging-chore-myaccount-api-autoupdate/o1UR_wVpl9p5EHsG/docs/images/cdy7uua7fh8z/6Kcn0ai9fsVsqHwZpTGByG/37cbf4ffee63a7010926b15f06dd20ac/custom-signup-step-node.png?w=840&fit=max&auto=format&n=o1UR_wVpl9p5EHsG&q=85&s=fd37f2a29ede963e5ef98cebe875bfcf 840w, https://mintcdn.com/docs-staging-chore-myaccount-api-autoupdate/o1UR_wVpl9p5EHsG/docs/images/cdy7uua7fh8z/6Kcn0ai9fsVsqHwZpTGByG/37cbf4ffee63a7010926b15f06dd20ac/custom-signup-step-node.png?w=1100&fit=max&auto=format&n=o1UR_wVpl9p5EHsG&q=85&s=34b36b27765ed05006fb534487299f61 1100w, https://mintcdn.com/docs-staging-chore-myaccount-api-autoupdate/o1UR_wVpl9p5EHsG/docs/images/cdy7uua7fh8z/6Kcn0ai9fsVsqHwZpTGByG/37cbf4ffee63a7010926b15f06dd20ac/custom-signup-step-node.png?w=1650&fit=max&auto=format&n=o1UR_wVpl9p5EHsG&q=85&s=8499835fdd74faeb1c2058ce57006f31 1650w, https://mintcdn.com/docs-staging-chore-myaccount-api-autoupdate/o1UR_wVpl9p5EHsG/docs/images/cdy7uua7fh8z/6Kcn0ai9fsVsqHwZpTGByG/37cbf4ffee63a7010926b15f06dd20ac/custom-signup-step-node.png?w=2500&fit=max&auto=format&n=o1UR_wVpl9p5EHsG&q=85&s=cda3da48f56281035d59d619f3983139 2500w" />
</Frame>

<h3 id="configure-the-flow-node">
  Flow ノードを設定する
</h3>

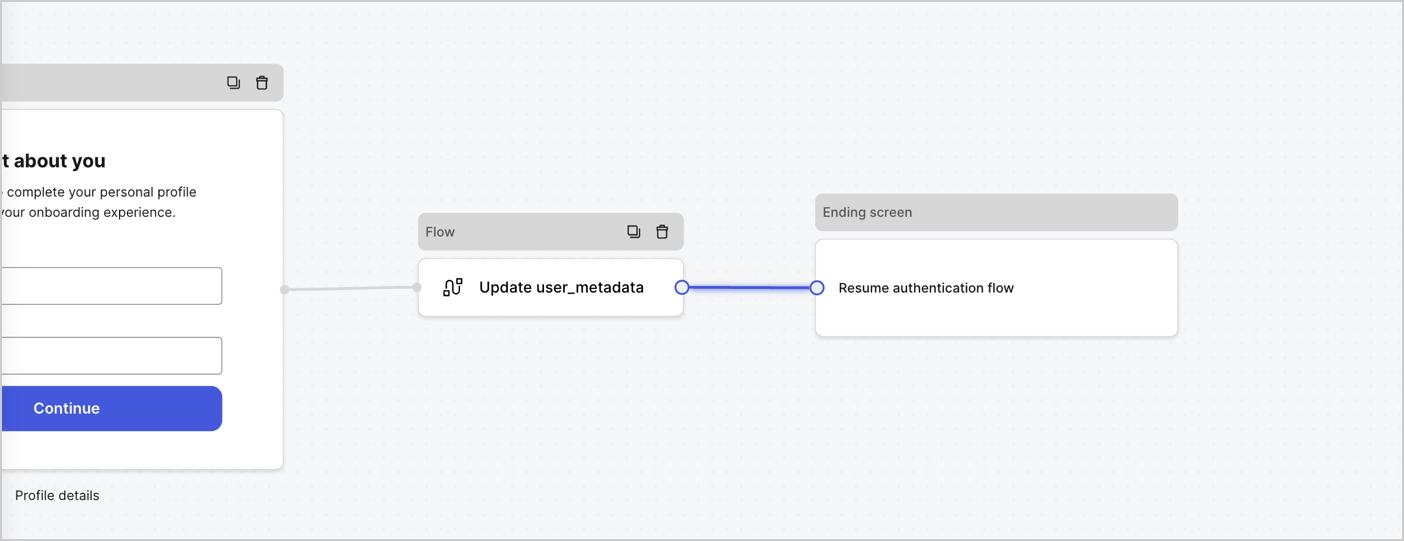
以下の手順に従って、`user_metadata` を更新し、認証フローを再開するために **Step** ノードの後に **Flow** ノードを追加します。

1. フォームエディターの下部で **Flow** を選択します。
2. **Step** ノードと **Ending Screen** ノードの間にある既存のリンクを削除します。
3. 新しい **Flow** > **Click to add a flow** > **Create a new flow.** を選択します。

   * **Name** フィールドに `Update user_metadata` と入力します。
   * **Create** を選択します。
   * **Save** を選択します。
4. 下図のように、**Flow** ノードを **Step** ノードと **Ending Screen** ノードに接続します。
5. 保存するには **Publish** を選択します。
<Frame>
  <img src="https://mintcdn.com/docs-staging-chore-myaccount-api-autoupdate/gX70I896qXZ9LmsE/docs/images/cdy7uua7fh8z/4nTdYdA2Hu5vK65smkdvJg/db3294ebc25a7c2636be96362a3ea56e/custom-signup-step-flow.png?fit=max&auto=format&n=gX70I896qXZ9LmsE&q=85&s=e7a6075d12cab5eab6039ca10253bc30" alt="Dashboard > Actions > Forms > Use Case Custom Signup Step Update User metadata flow" data-og-width="1404" width="1404" data-og-height="541" height="541" data-path="docs/images/cdy7uua7fh8z/4nTdYdA2Hu5vK65smkdvJg/db3294ebc25a7c2636be96362a3ea56e/custom-signup-step-flow.png" data-optimize="true" data-opv="3" srcset="https://mintcdn.com/docs-staging-chore-myaccount-api-autoupdate/gX70I896qXZ9LmsE/docs/images/cdy7uua7fh8z/4nTdYdA2Hu5vK65smkdvJg/db3294ebc25a7c2636be96362a3ea56e/custom-signup-step-flow.png?w=280&fit=max&auto=format&n=gX70I896qXZ9LmsE&q=85&s=a8ab9b54a6e252f6c301d944f5c3cea6 280w, https://mintcdn.com/docs-staging-chore-myaccount-api-autoupdate/gX70I896qXZ9LmsE/docs/images/cdy7uua7fh8z/4nTdYdA2Hu5vK65smkdvJg/db3294ebc25a7c2636be96362a3ea56e/custom-signup-step-flow.png?w=560&fit=max&auto=format&n=gX70I896qXZ9LmsE&q=85&s=148c25b534a2ac97177e1143a7238503 560w, https://mintcdn.com/docs-staging-chore-myaccount-api-autoupdate/gX70I896qXZ9LmsE/docs/images/cdy7uua7fh8z/4nTdYdA2Hu5vK65smkdvJg/db3294ebc25a7c2636be96362a3ea56e/custom-signup-step-flow.png?w=840&fit=max&auto=format&n=gX70I896qXZ9LmsE&q=85&s=f8a82441b72ca6392f21696738d74d67 840w, https://mintcdn.com/docs-staging-chore-myaccount-api-autoupdate/gX70I896qXZ9LmsE/docs/images/cdy7uua7fh8z/4nTdYdA2Hu5vK65smkdvJg/db3294ebc25a7c2636be96362a3ea56e/custom-signup-step-flow.png?w=1100&fit=max&auto=format&n=gX70I896qXZ9LmsE&q=85&s=434346bde370d83dc354211ef7d0e640 1100w, https://mintcdn.com/docs-staging-chore-myaccount-api-autoupdate/gX70I896qXZ9LmsE/docs/images/cdy7uua7fh8z/4nTdYdA2Hu5vK65smkdvJg/db3294ebc25a7c2636be96362a3ea56e/custom-signup-step-flow.png?w=1650&fit=max&auto=format&n=gX70I896qXZ9LmsE&q=85&s=ccda9d0cd57e91d07778a53bfb7bdfab 1650w, https://mintcdn.com/docs-staging-chore-myaccount-api-autoupdate/gX70I896qXZ9LmsE/docs/images/cdy7uua7fh8z/4nTdYdA2Hu5vK65smkdvJg/db3294ebc25a7c2636be96362a3ea56e/custom-signup-step-flow.png?w=2500&fit=max&auto=format&n=gX70I896qXZ9LmsE&q=85&s=5ff1526aa177f69157f55a666ddc03f6 2500w" />
</Frame>

以下の手順に従って、フローに Auth0 の Update user アクションを追加します。

1. **Flow** **Update user\_metadata** > **Edit flow** を選択し、新しいタブで Flow エディタを開きます。
2. StartAction の下にある **+** アイコンを選択して **Update user** Action を追加します。以下の項目を入力し、続行するには **Save** を選択します。

   * **Connection**: ドロップダウンから、M2M アプリケーションへの Vault 接続を選択します。

   * **User ID**: `{{context.user.user_id}}` と入力します。

   * **Body**: 次のコードをコピー＆ペーストして、`full_name` プロパティと `job_title` プロパティで `user_metadata` を更新します。

     ```json lines theme={null}
     {
       "user_metadata": {
         "full_name": "{{fields.full_name}}",
         "job_title": "{{fields.job_title}}"
       }
     }
     ```

   * **Save** を選択します。
3. 保存するには **Publish** を選択します。

<h2 id="retrieve-your-form-render-code">
  フォームのレンダリングコードを取得する
</h2>

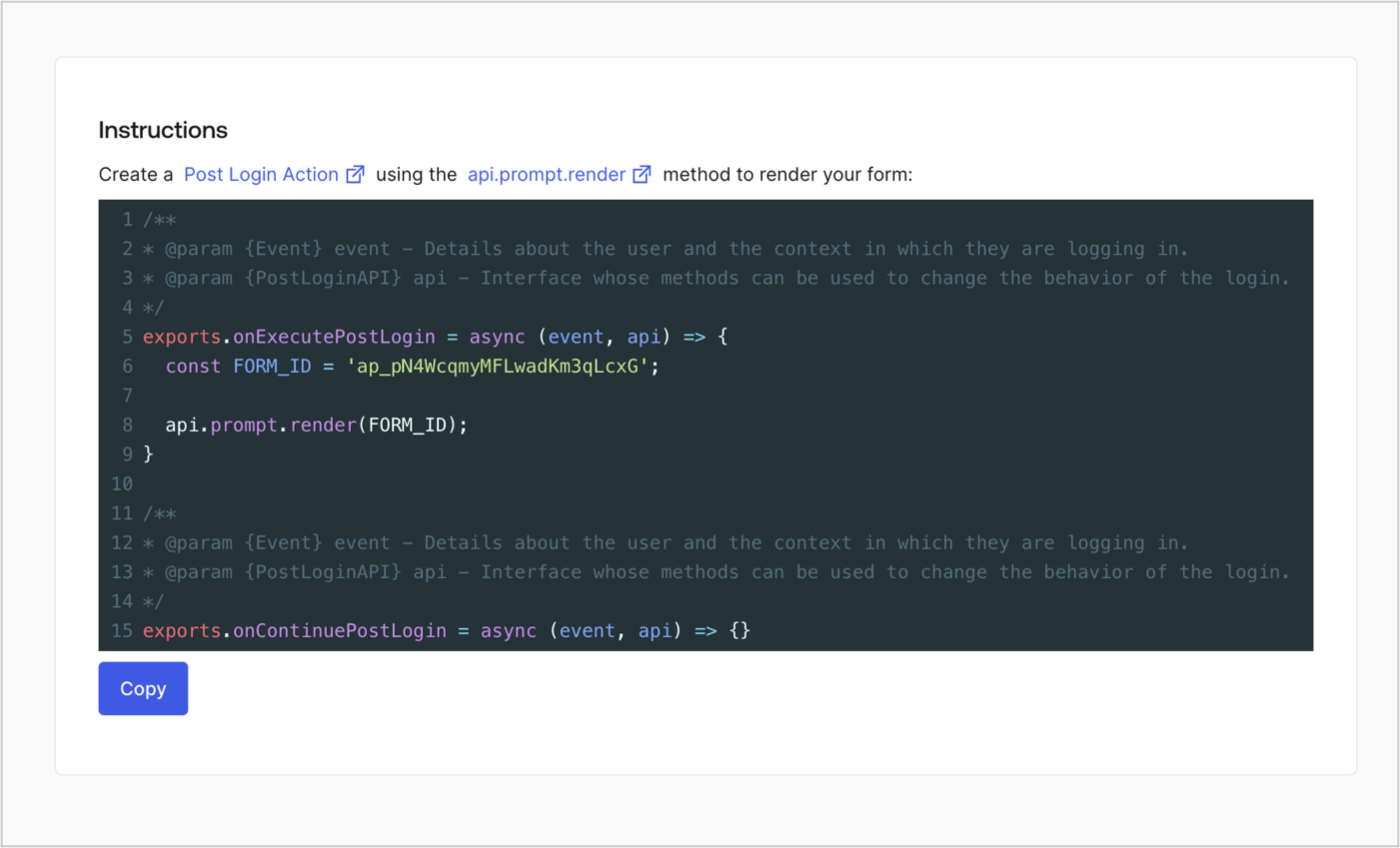
カスタムの Post Login Action でフォームを表示するためのフォームのレンダリングコードを取得するには、次の手順に従います。

* フォームエディターで、**`<> Render`** を選択します。
* **Copy** を選択します。
<Frame>
  <img src="https://mintcdn.com/docs-staging-chore-myaccount-api-autoupdate/nuDe4v-q_ZNWMmoT/docs/images/cdy7uua7fh8z/2EIUzc539sq9lwoTKbjoJv/496a864c0fc44a782c9cadca119dbfb0/embed.png?fit=max&auto=format&n=nuDe4v-q_ZNWMmoT&q=85&s=995003cf24493f6ac3b8efc92fe63dea" alt="Dashboard > Actions > Forms > Form > Embed" data-og-width="1400" width="1400" data-og-height="848" height="848" data-path="docs/images/cdy7uua7fh8z/2EIUzc539sq9lwoTKbjoJv/496a864c0fc44a782c9cadca119dbfb0/embed.png" data-optimize="true" data-opv="3" srcset="https://mintcdn.com/docs-staging-chore-myaccount-api-autoupdate/nuDe4v-q_ZNWMmoT/docs/images/cdy7uua7fh8z/2EIUzc539sq9lwoTKbjoJv/496a864c0fc44a782c9cadca119dbfb0/embed.png?w=280&fit=max&auto=format&n=nuDe4v-q_ZNWMmoT&q=85&s=5128925603cef5f85a41d7c0d9d6a691 280w, https://mintcdn.com/docs-staging-chore-myaccount-api-autoupdate/nuDe4v-q_ZNWMmoT/docs/images/cdy7uua7fh8z/2EIUzc539sq9lwoTKbjoJv/496a864c0fc44a782c9cadca119dbfb0/embed.png?w=560&fit=max&auto=format&n=nuDe4v-q_ZNWMmoT&q=85&s=e034a6894cf619cb743868b92eea20c0 560w, https://mintcdn.com/docs-staging-chore-myaccount-api-autoupdate/nuDe4v-q_ZNWMmoT/docs/images/cdy7uua7fh8z/2EIUzc539sq9lwoTKbjoJv/496a864c0fc44a782c9cadca119dbfb0/embed.png?w=840&fit=max&auto=format&n=nuDe4v-q_ZNWMmoT&q=85&s=52a0e8c7773b04201474ee6cc9b2491a 840w, https://mintcdn.com/docs-staging-chore-myaccount-api-autoupdate/nuDe4v-q_ZNWMmoT/docs/images/cdy7uua7fh8z/2EIUzc539sq9lwoTKbjoJv/496a864c0fc44a782c9cadca119dbfb0/embed.png?w=1100&fit=max&auto=format&n=nuDe4v-q_ZNWMmoT&q=85&s=a67dc66284b9cf955af070c09ba30871 1100w, https://mintcdn.com/docs-staging-chore-myaccount-api-autoupdate/nuDe4v-q_ZNWMmoT/docs/images/cdy7uua7fh8z/2EIUzc539sq9lwoTKbjoJv/496a864c0fc44a782c9cadca119dbfb0/embed.png?w=1650&fit=max&auto=format&n=nuDe4v-q_ZNWMmoT&q=85&s=73a56c78bf6f0ffa1858b8566bcde69b 1650w, https://mintcdn.com/docs-staging-chore-myaccount-api-autoupdate/nuDe4v-q_ZNWMmoT/docs/images/cdy7uua7fh8z/2EIUzc539sq9lwoTKbjoJv/496a864c0fc44a782c9cadca119dbfb0/embed.png?w=2500&fit=max&auto=format&n=nuDe4v-q_ZNWMmoT&q=85&s=d6d3375b1f14f9d2633b5542bf61691a 2500w" />
</Frame>

<h2 id="create-a-post-login-action">
  Post Login Action を作成する
</h2>

次の手順に従って、フォームを表示する post-login Action を作成します。

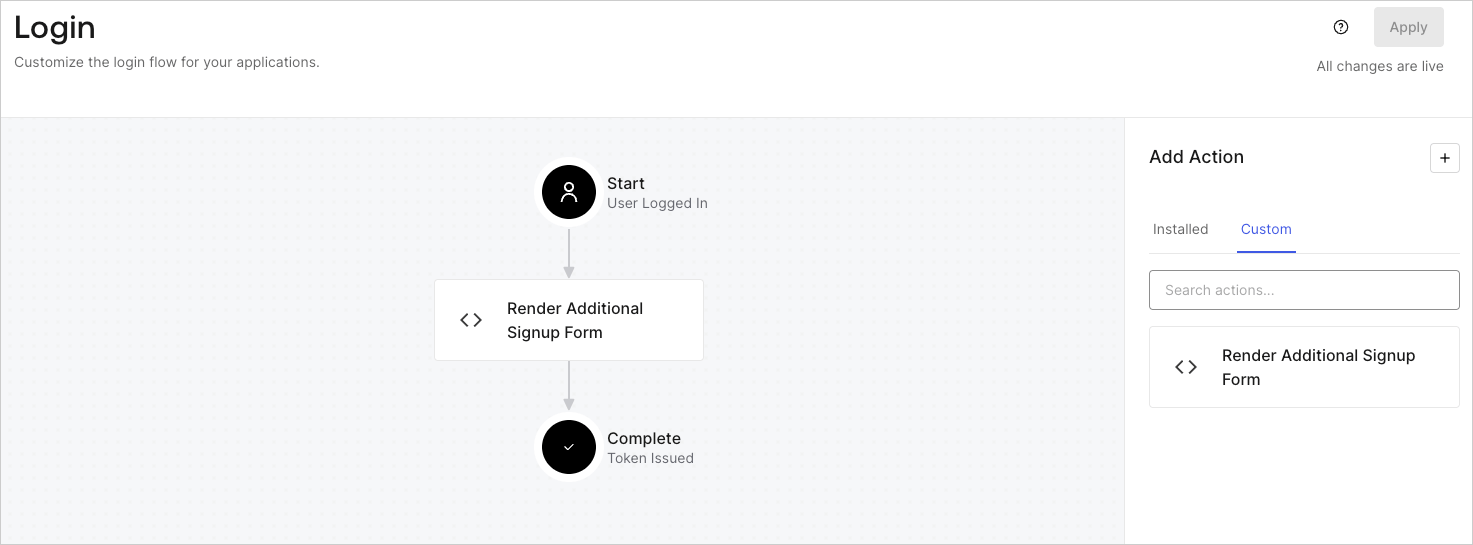
1. **Auth0 Dashboard > Actions > Flows > Login** に移動します。
2. **+** アイコンを選択し、**Build from scratch** を選択します。

   * **Name**: `Render Additional Signup Form` と入力します。
   * **Trigger**: `Login / Post Login` を選択します。
   * **Runtime**: 推奨バージョンを選択します。
3. **Create** を選択します。

post-login Action を設定するには、次の手順を実行します。

1. Code editor から既存のコードを削除します。
2. フォームを表示するコードを Code editor に貼り付けます。
3. フォームを表示する条件ロジックを定義するようにコードを編集します。

   ```javascript lines theme={null}
   /**
   * @param {Event} event - ユーザーと、ユーザーがログインしている状況に関する詳細。
   * @param {PostLoginAPI} api - ログインの動作を変更するためのメソッドを利用できるインターフェース。
   */
   exports.onExecutePostLogin = async (event, api) => {
     const FORM_ID = 'REPLACE_WITH_YOUR_FORM_ID';

     if (
       !event.user.user_metadata.full_name &&
       !event.user.user_metadata.job_title
     ) {
       api.prompt.render(FORM_ID);
     }
   }

   exports.onContinuePostLogin = async (event, api) => { }
   ```

   <Callout icon="file-lines" color="#0EA5E9" iconType="regular">
     上記のコード例では、ユーザーの user metadata に full\_name プロパティと job\_title プロパティがない場合にフォームが表示されます。
   </Callout>
4. **Deploy** を選択します。
5. **Render Additional Signup Form** Action を **Login** フローにドラッグ＆ドロップします。

   <Frame>
     <img src="https://mintcdn.com/docs-staging-chore-myaccount-api-autoupdate/fsZvFockSjnUvAgz/docs/images/cdy7uua7fh8z/1WBOicIOcH98hKj6Lq9HF2/4951e30a0cc08c7c5daa0116eaa17e11/Screenshot_2024-03-01_at_15.48.00.png?fit=max&auto=format&n=fsZvFockSjnUvAgz&q=85&s=59489539a63e4edac4963a43a2906efa" alt="Dashboard > Forms > Use Cases Custom Signup Steps Login Flow" data-og-width="1473" width="1473" data-og-height="545" height="545" data-path="docs/images/cdy7uua7fh8z/1WBOicIOcH98hKj6Lq9HF2/4951e30a0cc08c7c5daa0116eaa17e11/Screenshot_2024-03-01_at_15.48.00.png" data-optimize="true" data-opv="3" srcset="https://mintcdn.com/docs-staging-chore-myaccount-api-autoupdate/fsZvFockSjnUvAgz/docs/images/cdy7uua7fh8z/1WBOicIOcH98hKj6Lq9HF2/4951e30a0cc08c7c5daa0116eaa17e11/Screenshot_2024-03-01_at_15.48.00.png?w=280&fit=max&auto=format&n=fsZvFockSjnUvAgz&q=85&s=51217c316b72e8551d28c9a22689f8e3 280w, https://mintcdn.com/docs-staging-chore-myaccount-api-autoupdate/fsZvFockSjnUvAgz/docs/images/cdy7uua7fh8z/1WBOicIOcH98hKj6Lq9HF2/4951e30a0cc08c7c5daa0116eaa17e11/Screenshot_2024-03-01_at_15.48.00.png?w=560&fit=max&auto=format&n=fsZvFockSjnUvAgz&q=85&s=40eee80c40684fb8170ca33cf362cc25 560w, https://mintcdn.com/docs-staging-chore-myaccount-api-autoupdate/fsZvFockSjnUvAgz/docs/images/cdy7uua7fh8z/1WBOicIOcH98hKj6Lq9HF2/4951e30a0cc08c7c5daa0116eaa17e11/Screenshot_2024-03-01_at_15.48.00.png?w=840&fit=max&auto=format&n=fsZvFockSjnUvAgz&q=85&s=bc960a04208da51511c1c13b7b8f81b3 840w, https://mintcdn.com/docs-staging-chore-myaccount-api-autoupdate/fsZvFockSjnUvAgz/docs/images/cdy7uua7fh8z/1WBOicIOcH98hKj6Lq9HF2/4951e30a0cc08c7c5daa0116eaa17e11/Screenshot_2024-03-01_at_15.48.00.png?w=1100&fit=max&auto=format&n=fsZvFockSjnUvAgz&q=85&s=b19995f20d8eda06457127196d43997c 1100w, https://mintcdn.com/docs-staging-chore-myaccount-api-autoupdate/fsZvFockSjnUvAgz/docs/images/cdy7uua7fh8z/1WBOicIOcH98hKj6Lq9HF2/4951e30a0cc08c7c5daa0116eaa17e11/Screenshot_2024-03-01_at_15.48.00.png?w=1650&fit=max&auto=format&n=fsZvFockSjnUvAgz&q=85&s=dada1e3cb520d533c818a38c02b8b371 1650w, https://mintcdn.com/docs-staging-chore-myaccount-api-autoupdate/fsZvFockSjnUvAgz/docs/images/cdy7uua7fh8z/1WBOicIOcH98hKj6Lq9HF2/4951e30a0cc08c7c5daa0116eaa17e11/Screenshot_2024-03-01_at_15.48.00.png?w=2500&fit=max&auto=format&n=fsZvFockSjnUvAgz&q=85&s=7c6cc4ea235b25193e9e91ad1f412d91 2500w" />
   </Frame>
6. **Apply** を選択します。

<h3 id="test-implementation">
  実装をテストする
</h3>

次の手順で実装をテストします。

* 新しいユーザーとしてアプリケーションにサインアップします。
* Login フロー内の post-login Action によってフォームが表示され、情報の入力が求められます。
* **<Tooltip tip="Auth0 Dashboard: サービスを設定するための Auth0 の主要製品。" cta="用語集を見る" href="/docs/ja-jp/glossary?term=Auth0+Dashboard">Auth0 Dashboard</Tooltip> > User Management > Users** を選択し、新しいユーザーを見つけて、属性 `full_name` と `job_title` に追加のサインアップ手順で入力した情報が含まれていることを確認します。